Have you ever wondered if there’s an easier way to wax your car for that perfect shine? Look no further! In ‘Effortless Car Waxing: 11 Pro Tips for Perfect Results,’ we’ll explore the secrets to achieving a showroom-worthy finish without breaking a sweat.
From choosing the right wax to mastering the application technique, these expert tips will revolutionize your car waxing game. With a second person point of view, active voice, and contractions, you’ll feel like a pro as you effortlessly glide through each step.
So, get ready to transform your car’s appearance and protect its paintwork with these 11 professional tips. Get ready to be amazed by the results!
Choose the Right Car Wax
Are you unsure which car wax is the best choice for your vehicle? When it comes to choosing the right car wax, it’s important to consider the pros and cons of different types.
There are mainly two types of car wax: natural carnauba wax and synthetic wax. Natural carnauba wax offers a deep, glossy finish and provides excellent protection against UV rays.
On the other hand, synthetic wax is easier to apply and lasts longer. However, it may not provide the same level of shine as natural wax.
Another option is a hybrid wax, which combines the benefits of both natural and synthetic waxes.
It’s important to weigh the pros and cons of each type before making your decision.
Prepare the Car’s Surface
To prepare the car’s surface, start by thoroughly cleaning it to remove any dirt or debris that could affect the waxing process. This step is crucial for achieving a smooth and flawless finish.
Begin by washing the entire car with a gentle car wash soap and a microfiber cloth or sponge. Pay close attention to areas that are prone to dirt buildup, such as the lower parts of the car and the wheels. Rinse off the soap thoroughly and dry the car using a clean microfiber towel or a blower.
Next, inspect the surface for any stubborn stains or contaminants. Use a clay bar or a detailing clay to remove these imperfections. This pre-wax preparation will ensure that the surface is clean and ready to receive the wax, allowing it to adhere properly and provide long-lasting protection.
Start With a Clean and Dry Car
After preparing the car’s surface by cleaning it thoroughly, you can now move on to the next step: starting with a clean and dry car. This step is crucial for achieving perfect results when waxing your car. Before applying any wax, it’s important to ensure that your car is free from dirt, dust, and moisture.
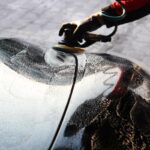
Using a car waxing machine can help you achieve a smooth and even application of wax. The machine’s oscillating motion allows the wax to be evenly distributed, ensuring maximum coverage and protection.
Additionally, using a clay bar before waxing can further enhance the results. The clay bar helps remove any embedded contaminants from the car’s surface, leaving it smooth and ready for waxing.
Apply Wax in Small Sections
To achieve a professional waxing job, take the next step by applying wax in small sections of your car’s surface. This technique ensures that you apply the wax evenly and avoid wax buildup.
Start by dividing the car’s surface into manageable sections, such as the hood, roof, doors, and fenders. Apply a thin layer of wax to one section at a time, using a clean applicator pad or a microfiber cloth.
Work the wax into the surface using circular motions, making sure to cover the entire section. Once you’ve finished waxing one section, move on to the next, repeating the process until you’ve covered the entire car.
Use Circular Motions for Even Coverage
For even coverage when applying wax to your car, use circular motions as you work the product into the surface. By using circular motions, you ensure that the wax is applied evenly and that it reaches every nook and cranny of your car’s exterior. This technique allows the wax to penetrate the surface and create a protective barrier that safeguards your car from dirt, UV rays, and other environmental contaminants.
Circular motion benefits also include minimizing the risk of streaks and missed spots, resulting in a more polished and professional finish. When using this proper waxing technique, remember to apply moderate pressure and work in small sections to ensure thorough coverage.
Let the Wax Dry to a Haze
To ensure optimal results, allow the applied wax to dry until a hazy film forms on the surface of your car. This step is crucial in the car waxing process as it allows the wax to bond with the paintwork and create a protective layer. The drying time can vary depending on the weather conditions and the type of wax used, so it’s important to read the instructions on the waxing product. While waiting for the wax to dry, you can take this time to gather your buffing techniques and get your equipment ready. Once the hazy film has formed, you can proceed with the next step of buffing the wax off, revealing a beautiful, glossy finish.
| Buffing Techniques | Best Waxing Products |
|---|---|
| Circular motions | Liquid wax |
| Overlapping strokes | Paste wax |
| Light pressure | Spray wax |
| Microfiber cloth | Synthetic wax |
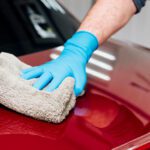
Buff off the Wax With a Microfiber Cloth
Wondering how to effectively remove the dried wax from your car’s surface? Look no further! Buffing off the wax with a microfiber cloth is a simple and efficient way to achieve that perfect finish. Here are four essential tips to help you get the best results:
- Gentle Pressure: Apply moderate pressure while buffing to avoid scratching the surface of your car.
- Circular Motion: Use small, circular motions to evenly distribute pressure and ensure all the excess wax is removed.
- Change Cloth Regularly: As the cloth becomes saturated with wax, switch to a clean one to avoid spreading residue back onto the surface.
- Choose the Right Cloth: Opt for a high-quality microfiber cloth that’s specifically designed for car detailing to avoid lint or streaks.
Pay Attention to Difficult Areas
To effectively tackle difficult areas while waxing your car, use a small amount of wax on a foam applicator. Difficult areas can include hidden spots and intricate designs that may be challenging to reach or navigate.
When faced with tight spaces, such as narrow gaps between body panels or around door handles, apply the wax carefully using the foam applicator. The small size of the applicator allows for more precision and control, ensuring that the wax reaches these hard-to-reach areas.
Additionally, when dealing with textured surfaces, such as grilles or bumpers, make sure to work the wax into the crevices and grooves using circular motions. This will help protect and enhance the appearance of the intricate designs, leaving your car looking flawless and well-maintained.
Don’t Forget the Trim and Chrome
Make sure you apply wax to all of the trim and chrome on your car for a thorough and polished finish. Neglecting the trim and chrome surfaces can leave your car looking incomplete and less than perfect. Here are some tips to help you effectively wax these areas:
- Importance of protecting trim and chrome during car waxing:
- Waxing the trim and chrome not only enhances their appearance but also provides a layer of protection against UV rays, oxidation, and other environmental factors.
- By applying wax regularly, you can prevent the trim and chrome from fading, peeling, or developing rust.
- Tips for effectively waxing trim and chrome surfaces:
- Use a specialized trim and chrome cleaner to remove any dirt, grime, or oxidation before waxing.
- Apply a small amount of wax directly onto a foam applicator pad and gently rub it onto the trim and chrome surfaces.
- Use a microfiber cloth to buff the waxed areas, ensuring a smooth and glossy finish.
- For intricate or hard-to-reach areas, use a small detailing brush to apply wax and remove any excess.
Apply Multiple Coats for Added Protection
For maximum protection, it’s recommended to apply multiple coats of wax to your car’s surfaces. This will provide an extra layer of defense against the elements and keep your car looking its best. Using a car wax with UV protection offers added benefits by preventing the sun’s harmful rays from fading your paint job.
To ensure a smooth and even application, it’s important to remove any excess wax residue after each coat. Here are some tips for removing excess wax residue:
- Use a microfiber cloth or a soft, lint-free cloth to gently wipe away any excess wax.
- Apply light pressure and use circular motions to remove the residue.
- Check for any remaining residue by inspecting the surface under different lighting conditions.
- Repeat the process if necessary until all excess wax is removed.
Maintain the Waxed Finish Regularly
To keep your car’s waxed finish looking its best, regularly maintain it with simple steps. Here are some tips to help you maintain the waxed finish on your car:
- Choose the best waxing products: Select a high-quality car wax that suits your needs. Look for products that provide long-lasting protection and enhance the shine of your car’s paint.
- Wash your car regularly: Regularly washing your car helps remove dirt, grime, and contaminants that can dull the waxed finish. Use a pH-neutral car wash soap and a soft sponge or microfiber cloth to avoid scratching the paint.
- Dry your car thoroughly: After washing, dry your car using a clean, soft cloth or a microfiber towel. This prevents water spots and helps maintain the glossy appearance of the waxed finish.
- Wax your car as needed: How often you should wax your car depends on various factors, such as the climate, usage, and the type of wax used. As a general rule, aim to wax your car every 3 to 6 months to ensure optimal protection and shine.
Conclusion
So, there you have it! With these 11 pro tips, car waxing can be a breeze.
Remember to choose the right wax, prepare the surface, and apply in small sections using circular motions.
Don’t forget to pay attention to difficult areas and the trim and chrome.
Applying multiple coats and maintaining the waxed finish regularly will provide added protection.
Get ready to achieve perfect results and have your car looking shiny and new!